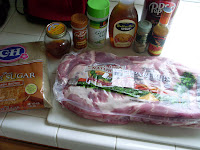
WARNING: This is a two day recipe! You can cook ribs in one day but I think the flavor is better if you can plan for the two day cook.
I use this same recipe for Baby back Ribs but Spare Ribs are less expensive and seem to be on sale a lot.
DAY 1

The recipe is divided into two parts - rub and sauce. First we need to trim and prep the ribs:


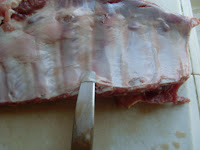
Step 1: Cut the flap of meat off the rack.
Step 2: Trim the chime bone and excess meat off the rack. Try and shape the rack with your cuts to make it look as rectangular as possible.
I use a 8" heavy chef knife but a cleaver works well too. It isn't easy to chop through the bones but a heavy knife certainly helps.
Next we have to remove the membrane:


Use a butter knife and slide the blade under the membrane between the 3rd and 4th bone. Once the blade is under the membrane, slide it up the 3rd bone and then pry upward. I use a paper towel to get a grip on the membrane and remove it completely from the rack. If you don't remove the membrane, the rack will be tougher and you won't get as much flavor penetrating into the meat.
NOTE: Some stores (like Costco) remove the membrane for you - particularly on Baby Back Ribs.


Now you have a trimmed rack with the membrane removed.
Note - I spread 1 tbspn of Scotch Bonnet Pepper Sauce on each rack prior to adding he dry rub. This provides some heat to get cooked into the meats.
This recipe is per rack:
Black Pepper - 1 tbspn
Season Salt - 1 tbspn
Garlic Powder - 1 tbspn
Onion Powder - 1 tbspn
Chili Powder - 2 tbspn
Paprika - 1/2 tbspn
Cinnamon - a pinch
Rub down both sides of the rack with the dry rub.
Note: If you don't have Scotch Bonnet Pepper Sauce (and I'm guessing you don't and can't find it - hence the "secret weapon" - use green habanero sauce. Also if you don't have Sorghum Syrup (and I'm guessing you don't) you may be able to find it at Trader Joes OR you can substitute in molasses but use 1/2 as much molasses as sorghum syrup.

Here's the step where people will either like or dislike my recipe:
Wrap the rack in foil and pour about 1/2 cup of Dr. Pepper. Make sure the foil is wrapped so the liquid doesn't leak out. Basically we are going to braise the rack.
I set the smoker at about 250F and cook until the internal temp is at 160F. It usually takes about 2 hours to reach this internal temp.
These ribs are at temp. Once the ribs have reached temp, put them in the fridge overnight. Keep them wrapped up in the juices / Dr. Pepper! Make sure the foil is still water tight or you will get a nice sticky puddle.
DAY 2
Basically you have cooked ribs that need to be re-heated. The reason I like to cook the ribs this way is it gives you the ability to bring the ribs up to final temp and really control the final color of the rack. It also gives you the ability to have the ribs ready at a specific time. I think it also adds a really great flavor to the rack by letting it sit overnight.


I add brown sugar to the racks to add some sweetness as well as effect the color I want to obtain. I usually add about 1 cup per rack during this process. Depending on how they smell after they soak overnight, I might add a little more garlic and onion powder too.
Basically you have cooked ribs that need to be re-heated. The reason I like to cook the ribs this way is it gives you the ability to bring the ribs up to final temp and really control the final color of the rack. It also gives you the ability to have the ribs ready at a specific time. I think it also adds a really great flavor to the rack by letting it sit overnight.


I add brown sugar to the racks to add some sweetness as well as effect the color I want to obtain. I usually add about 1 cup per rack during this process. Depending on how they smell after they soak overnight, I might add a little more garlic and onion powder too.
Set the grill / smoker so the grate temp is around 250F. I start with meat side up and then flip once after 1/2 hour. I'll add a handful of brown sugar to each side. As soon as the brown sugar is melted when the meat side is down, I'll flip the rack back to meat side up.
As soon as the ribs reach internal temp of 180F, pull them and wrap them up in foil with the sauce. Please use the temperature as a reference only. The best way to tell if the ribs are done is the "bend test" Pick up the rack in the middle and the ends should bend down easily. Be careful - if the ribs are overdone or approaching overdone, the rack will break!
I NEVER put sauce on ribs while they are on the grill. I use a very sugary sauce and it will caramelize and alter the color of the rack - remember, I am doing this two day process to exactly control the color I want for my competition turn in ribs.


The Sauce (recipe is per rack):
Heat up in a saucepan about 15 minutes prior to the ribs being ready to pull:
Scotch Bonnet Pepper Sauce - 2 tblspn
Honey - 3 tblspn
Sorghum Syrup - 3 tblspn
Brown Sugar - 1 cup
Season Salt - 1/2 tblspn
BBQ Sauce (I use Sweet Baby Rays Original) - 1/2 cup
Place the rack in foil and pour the sauce over the rack and then wrap up tight and then wrap the foil pack in a towel. The great thing about wrapping the ribs in foil is the sauce magically coats the rack evenly and wrapping the foiled rack in a towel will let the meat rest. It will usually hold acceptable temp for an hour like this.


I slice meat side down so I can see the bone. This is typically a no no at competitions because the meat will tear on the cut edges. A very sharp knife helps.


The end of this rack got a little too much heat but it still turned out pretty good! You can also see the color (in the non burned area) is what I was looking for - the sauce is evenly coated without being excessive.


Time to eat!
Side Note: To make this recipe in one day, use the same dry rub and cook at 250 for approximately 3 hours. Internal temp should get to 180F for tender ribs. Don't use the brown sugar until the last hour - 1/2 hour per side - 1/2 cup of brown sugar per side. Start the ribs meat side down for 1 hour, meat side up for second hour, then 1/2 hour per side with the brown sugar IF internal temp is close to 160 after 2nd hour. You still need to wrap them in foil (and beach towel) with the sauce after they are done - for about 1/2 hour minimum.


