Wednesday, December 14, 2011

Smoked Beef Tenderloin

Smoked Beef Tenderloin

This cut of meat is perfect for a fantastic Holiday meal with family and friends or a special occasion.  It is quite expensive, so let's cook it right and savor every bite!

Beef Tenderloin is probably the most tender portion of the cow - this is where the Fillet Mignon steak is sliced from.  If you pick up one of these pieces of meat you can slice it into the size steaks you want but one of my favorite things to do is smoke the entire cut at once.  It's kind of like a really great piece of Prime Rib Roast - but better.


 My favorite way to cook this cut of meat is on the smoker but you can easily do it in the oven too.  You could cook it on a charcoal grill if you cook it in indirect heat and if your grill is large enough.  I wouldn't recommend cooking on a gas grill unless the grill is extra large and you have good control over the temperature on the indirect side.
There are only two ingredients for this cook - beef tenderloin and thick cut bacon.
First step is to dry rub the meat down with your favorite dry rub.  There are lots of techniques to get the rub to stick to the meat better - like slathering the meat with mustard or worchestire - but my favorite is to use olive oil.  After the meat is rubbed down with one of your favorite binding agents, go ahead and get a heavy layer of your favorite dry rub.  A simple suggestion is equal parts of black pepper, sea salt, and granulated garlic.  Sometimes simple is better. 
 After the meat is dry rubbed, layer the thick cut bacon over the entire cut of meat.  Why?  Because everything is better wrapped in bacon!  This piece of meat typically has enough marbling / fat to keep it moist during the cook - AND - we are going to pull this meat at as low of a temp you can handle but wrapping in bacon adds a little extra flavor.
Since this meat has to be pulled off at a very specific internal temp, make sure you use some type of meat probe so you can monitor the cook.  I cooked this on the smoker at a grate temp of 225F.  When the internal temp hits 135F, I pulled it off the cooker, removed the bacon, wrapped it in foil and then in a beach towel and placed in a clean, dry cooler to rest for 30 minutes.  This temp will have your meat at a perfect medium rare 138 or so after resting.  The resting will also allow the juices in the meat to re-distribute throughout the meat ensuring it is super juicy. 
Since this cut of meat was wrapped in bacon during the cook, there isn't a really thick crust or bark on the outside but you can see the flavor wrapped around the outside from the dry rub.  Let's slice this bad boy open!
 Kind of like a really great prime rib, slice this cut in nice, thick slices.  You can see the inside is pink and the pink extends all the way to the edge of the meat.  You can also see how incredibly juicy the meat is.  Combine this with your favorite meat sides like baked potatoes, some bacon wrapped asparagus, or some stuffed mushroom caps.  Let's eat!

Wednesday, November 30, 2011

Stuffed Cheeseburgers!

Stuffed Cheeseburgers are easy to make and basically a blank protein canvas (Thanks Greg Rempe for the phrase).  The options to stuff burgers is limitless - whatever you can possibly imagine, you can jam between two patties of meat!
For today's stuffed burgers, I used ground chuck.  There is enough flavor in whatever you are stuffing to overcome any flavor shortcomings using a lesser grade meat but the ground chuck was perfect!  I stuffed these burgers today with bacon and blue cheese crumbles. 
 
The ingredient list is short - about 5lbs of ground chuck, 2lbs of bacon, and 12oz of blue cheese crumbles.  Add in some onion rolls and some extra slices of medium cheddar to top it off.  I added two eggs and some salt and pepper to the ground chuck for a little seasoning.
 I cooked up some thick cut bacon until it was pretty crispy then diced it up into small pieces. 
I added the eggs to a bowl, a few teaspoons of sea salt and course ground black pepper along with the meat and combined well.  I separated the 5lbs of ground chuck into 12 equal portions -each was rolled into a ball between the size of a golf ball and a base ball.  Lay out a long piece of wax paper and flatten the 12 balls into equal size patties.

Place a generous portion of blue cheese crumbles and diced bacon onto 6 of the 12 patties.  Then place its' twin onto it's buddy.
Press the edges together until they are sealed and then reform the patties into a ready for the grill piece of art work.
  
 For this cook I used my WSM 22.5 - the finest charcoal bullet smoker ever made - I added some chunks of apple wood and oak to get some really great depth of flavor into the meat.  I didn't use any dry rub on the outside of the meat for this cook letting the wood and the ingredients do the job.
Stuffed patties and sausage on the smoker!
 
 Since these were cooked on a smoker in indirect heat, I didn't have to worry about flare ups from the fat rendering from the meat.  If you were going to cook these on a gas grill or on a charcoal grill, I would try and sear each patty for a few minutes per side and then finish them on the indirect side so they come up to the desired internal temperature nice and slow.
Use a thermometer to check the internal temperature of the burger.  This one was pulled at 145F which is medium well.  Even at this internal temperature it was still pretty juicy.  I prefer mine a medium rare / rare and it was awesome!  Toast the bun on the smoker for a few minutes while the cheddar is melting on top of the burger and you are ready to eat!

Thursday, November 17, 2011

Smoked Crab Salad Crostini

Here's a quick and easy appetizer that you can prep in 10 minutes, cook in 10 and be the star of the party with this one!

You can jam just about anything on a small slice of bread and look good. Let's take it a new, exotic level with some crab! The basic ingredients are a loaf of bread or a baguette and some imitation crab meat. I know - imitation crab meat is tasteless and gross. It is more like a blank slate with some texture that you can make taste like anything you want.

I made this two ways with the only difference is swapping the mayo with sour cream. The ingredient list I used in this recipe was going for fresh and spicy. I used a rustic Parmesan loaf but a baguette would be just as good. The fresh green onions and Roma tomatoes with a few savory ingredients were a great combination - and then - I threw in the Trader Joe's 21 Gun Salute for a great hit of spice and heat.


  • Imitation Crab Meat - 1lb


  • Green Onions - 1 bunch


  • Roma Tomato - 2


  • Capers - 1 tablespoon


  • Worchestire Sauce - 1 tablespoon


  • Ground Chipotle Powder - 1 teaspoon


  • Mayo - about 2 table spoons
or swap out the mayo for sour cream.

Rough dice the crab meat and vegetables.


Fine dice the onions and then combine all the ingredients in a bowl.


The bowl on the left has mayo and the bowl on the right used sour cream. The mayo mixture was a bit darker for some reason.


Slice the bread and add a big spoon of the mix onto each slice.


I heated these up on my Traeger Pellet Smoker at 250F for about 10 minutes or until the bread is a little crisp. You can also bake these in the oven or indirect heat on a charcoal or gas grill. Don't cook this over direct heat or the bread will burn. Another ingredient that would make this snack even better is some fresh grated Parmesan or cheddar.


The great thing about this recipe is you can create just about any flavor profile because the crab meat is a blank slate. Let's eat!

Thursday, November 3, 2011

Grilled Lettuce

That's right! You heard it here! Big Daddy eats lettuce even though lettuce is the Devil. Technically lettuce is a gateway vegetable - not the Devil. This recipe is perfect for a main course or to make a quick side that seems WAY fancier than it really is.

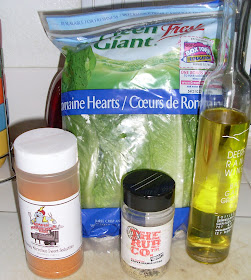
There are three basic ingredients for this recipe:
Romaine Hearts
Extra Virgin Olive Oil
Your favorite dry rub - in this case I used two of my favorites:

Simply Marvelous Sweet Seduction - seriously - if you haven't tried these rubs you are missing out. Do yourself a favor and get the sample pack. These rubs go great on everything from ribs to chicken to.... well.... lettuce!

The Rub Co Santa Maria Style dry rub. The Rub Co is another must have in every spice cabinet. A sample pack of these rubs will have you making restaurant style food that has the basics turbo boosted to a whole new flavor level!

Chop off the bottom of the romaine heart, spread open and rinse.


Unfurl the lettuce head. Don't worry about the residual water left in the head of lettuce. Drizzle on a few tablespoons of olive oil onto each lettuce head.


Shake on a good dose of the dry rub of your choice. If you don't have one of the dry rubs I've recommended, make up your own dry rub with your own flavors - maybe some salt, pepper, garlic, and a touch of brown sugar.


Fold the lettuce back up as tight as possible but do not tie shut. Place the lettuce heads on a grill or smoker pre-heated to 250F and cook indirectly. Do not cook over direct heat. If you are using a smoker, then you are already set up for indirect heat. On a charcoal grill, bank the coals on one side and cook the lettuce on the opposite side. If you are using a gas grill, turn all the burners on high heat to pre-heat the grill for about 5 minutes. When you are ready to cook the lettuce, turn one side off and the other side on low. Put the lettuce heads on the side with the heat off. Cook for about 5 minutes.


You don't want the lettuce to wilt but if it chars a bit on the outside, this is fine. Let the lettuce heads rest on the cutting board for no more than a few minutes otherwise it will wilt and lose some crunch.


Do a course chop and add whatever you like on a salad. Here I've added some hard salami and blue cheese crumbles. No need to add any dressing. The olive oil and dry rub with the residual water left in the lettuce head provide plenty of moisture and flavor. Dig in - Let's eat!

Friday, October 28, 2011

Cut / Chop / Cook - This is REAL BBQ!

CUT/CHOP/COOK from UM Media Documentary Projects on Vimeo.


This has to be one of the coolest video's I've seen about "real" BBQ.

Thursday, October 27, 2011

Salmon on the Smoker!

Salmon on the smoker!

This is not "smoked salmon". Smoked salmon is technically a piece of salmon that is brined and then cold smoked (under 95F). At the end of the process the salmon is cured. After it is cured it is ready to eat. You are more familiar with smoked salmon as lox or in the gold foil pack that you can get in the Seattle airport or as a holiday gift. This recipe is for smoking salmon - in other words - cooking salmon on a smoker!

There are plenty of ways to prepare salmon - specifically brining the fish. E-mail me and I'll get you some killer brining recipes for salmon but in this case, I didn't have the extra 4 - 5 hours to brine it properly so I used a really great dry rub to get some killer flavor on that fish....

I used Simply Marvelous Apple Rub. It has the perfect balance of sweet and spicy with a hint of apple wood that makes this fish sing. Do yourself a favor - visit this site and purchase a sample pack. You will NOT be disappointed! You can use your favorite dry rub but make sure that it doesn't have too much salt or heat. You want a little sweetness to pull this flavorful fish through.

Sprinkle on a heavy layer of the rub on both sides. Don't be shy with this rub.


Let this rub sit on the fish for 30 or so minutes to let it melt into the fish and let that flavor penetrate a bit.


While you're waiting for the dry rub to melt into the fish, get the sides ready A perfect side for this dish is some bacon wrapped asparagus. It takes about 60 minutes on medium or 275 F grate temp to finish up the bacon. You can't rush bacon!


I used Grill Grates to cook this fish on. Fish can get tender and fall apart during cooking. I realize that on a smoker you usually don't have to flip the meat cooking but I wanted to get some grill marks on the fish - it came out perfect.


I smoked the fish and bacon wrapped asparagus using a blend of apple and oak pellets at a grate temp of 250F. You could also cook these in the oven at the same temp but watch out for the bacon drippings in the oven. On a gas grill you should cook on indirect heat and use the Grill Grates. The fat drippings from the bacon could easily start a flare up fire.


On a side note - get these Grill Grates if you have a propane or charcoal grill and can't cook using indirect heat. They will improve your cooking technique and make you look like a pro!
Here's a shot of the fish after they've been flipped. Looking great!


Let's plate this chow up - salmon on the smoker, bacon wrapped asparagus and some steamed rice.


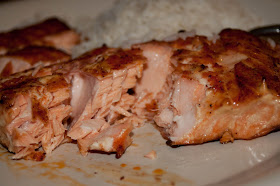
Here's a shot of the salmon cracked open with a fork. Super moist and really full of flavor. The dry rub and fish oil on the plate mixed with the rice added to the side.


Let's eat!
Monday, October 17, 2011

Rib Eye Steak!

There's not too many things better than a steak grilled to perfection! Rib Eye is a great steak to cook on a charcoal grill - it has plenty of fat marbled throughout, no bones to worry about, not too expensive, easy to find, and usually a large enough cut to satisfy almost everyone.


I think steak preparation should be as simple as possible. Salt, pepper, and some Extra Virgin Olive Oil.

Start by drizzling a bit of olive oil on each piece of meat and rub it into the meat so it is even. The olive oil isn't mandatory so if you don't have any don't worry about it. I would NOT suggest using any other type of oil as a substitute.


Shake on a healthy dose of Kosher Sea Salt and then add Course Ground Pepper or fresh ground pepper on top.


I let the salt / pepper rest on top of the meat for an hour or so. The salt melts into the meat getting that flavor deep inside.


Set up your charcoal grill for offset cooking. I use a loaf pan in the middle to keep the coals on one side. You can also utilize the loaf pan to add some moisture for longer cooks or to add a little flavor option like sweet onions. I cut a whole sweet onion in quarters and throw them in the kettle. As the heat reaches the onions, the flavor slowly releases and permeates hints of flavor into the meat.


When the coals are hot it's time to get to cooking.


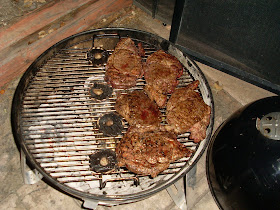
I sear the steaks directly over the super hot coals for 2 - 3 minutes per side. After the steaks are seared, I move them over to the indirect side. Popular opinion is that searing the steaks seals the juices into the meat. I think this is a wives tale and doesn't have any effect on the juiciness of the meat. I sear it to get the cooking process started and create those grill marks that people like to see as well as some crispness on the surface of the steak to give each bite a little crunch and texture different from the inside of the steak.


I put a couple of portabella mushrooms on the grate right outside of the direct heating zone. A great way to make an appetizer or to add to the steak.


After the steaks are all seared, move them over to the indirect zone and put the cover over the grate so the steaks can slowly come up to the desired internal temp.


Lots of "real men" can tell how a steak is cooked by pressing on it or comparing the resistance to your palm or nose. I say another wives tale. Get yourself a reliable meat thermometer. I use a super fast Pink Thermapen. A standard dial thermometer is more than fine. The Thermapen is instant and easy to read so this is an indispensable tool for me. When the temp hits the desired temperature, pull the steak and place on a plate for 5 - 10 minutes and let it rest.


Time to eat! Throw that steak on a plate after it rests for a few minutes. Add your favorite sides - garlic mashed potatoes, grilled vegetables, and maybe some onions and mushrooms.


Let's eat!