About Us

Joined by our passion for meat, beer, cards and meat, we created a compitition bbq team to partake in just that.

Thursday, September 15, 2011

Smoked Scotch Eggs

Smoked Scotch Eggs


Scotch eggs are basically a hard boiled egg wrapped in sausage and cooked and they are apparently a common snack in England. They are also typically coated in bread crumbs and then deep fried. In England they are even available pre-made in supermarkets. Unbelievable! It took me about 20 minutes of prep and another 60 minutes of cooking time but they were slow smoked This recipe is actually really simple with three total ingredients.

The three ingredients I used are hard boiled eggs, bratwurst, and one of my favorite dry rubs - Oakridge BBQ Secret Weapon.

I used about 1.5 lbs of sausage for five hard boiled eggs. You can purchase the sausage meat in chub packs (plastic sausage looking tube) in all kinds of flavors. I like bratwurst because it has a mild flavor and matched really well with the dry rub. I could have had a bit thicker layer of sausage - next time about 1/2lb of sausage per egg.

I uncased the sausage and put it in a 1 gallon zip lock bag. You can also take a 1 lb chub and also place it into the 1 gallon zip lock. The great thing about this process is you can easily make a nice flat, even layer of sausage.


After the sausage is flat, use a knife and cut open three sides. A perfect layer of sausage ready to work with.


Lay the egg onto the sausage layer and cut out a piece large enough to cover the egg - about 4 times the size of the egg.


Next - coat these eggs with a really heavy layer of dry rub. Make sure to coat all surfaces! I used Oakridge BBQ Secret Weapon dry rub. I really enjoy using this rub on all kinds of food. It has a really nice balance of sweet and heat and it matched superbly with the bratwurst.


You can use whatever rub and / or sausage combo that you like most - experiment with lots of ideas because there are no wrong answers with this recipe.


I smoked these eggs at 225F for about 1 hour. Since the egg was already done, you just have to make sure the sausage meat is cooked. Since the layer of sausage is so thin, it doesn't take long. You can bake these in the oven but watch out for fat rendering out of the meat. You can also cook these very easily on a gas grill but make sure you are not cooking over the flame. Cook these on a gas grill indirectly by leaving the burner on one side low and the cooking side completely off. If you are using a smoker or adding some wood, I would use something sweet to accent the meat like apple or peach wood.


Let these beauties rest for a minute and then slice into halves or quarters.


You can dip them in sauce or eat without. You can use these as an appetizer, a side course or a main course with some vegetables.


Let's eat!

Wednesday, August 24, 2011

Stuffed Smoked Tomatoes

Stuffed Smoked Tomatoes....

When the tomatoes are ripe on the vine, there seems to be more than you know what to do with. An easy and quick recipe that lets you use all these extra tomatoes is Stuffed Tomatoes. I cooked these in the smoker but you can easily bake these in the oven.

Stuffed vegetables and fruit are blank slates for any type of stuffing your imagination can come up with. I took a look in the fridge and came up with pre cooked Chicken Apple Sausage, some green onions, shredded cheese, and a little bit of Spring Green Salad. Stuffed Tomatoes are more difficult to cook than Stuffed Peppers because the skin is so delicate but they look different - Stuffed Tomatoes just aren't that common - but the effort is worth it if you enjoy the flavor of tomatoes. Lots of people don't like raw tomatoes but are big fans once they are cooked.

I diced up the green onions and rough chopped the Spring Salad. I ended up with about a cup of salad.


I figured about one sausage per tomato but the tomatoes I got at the Farmer's Market were good size. I chopped up the sausage.


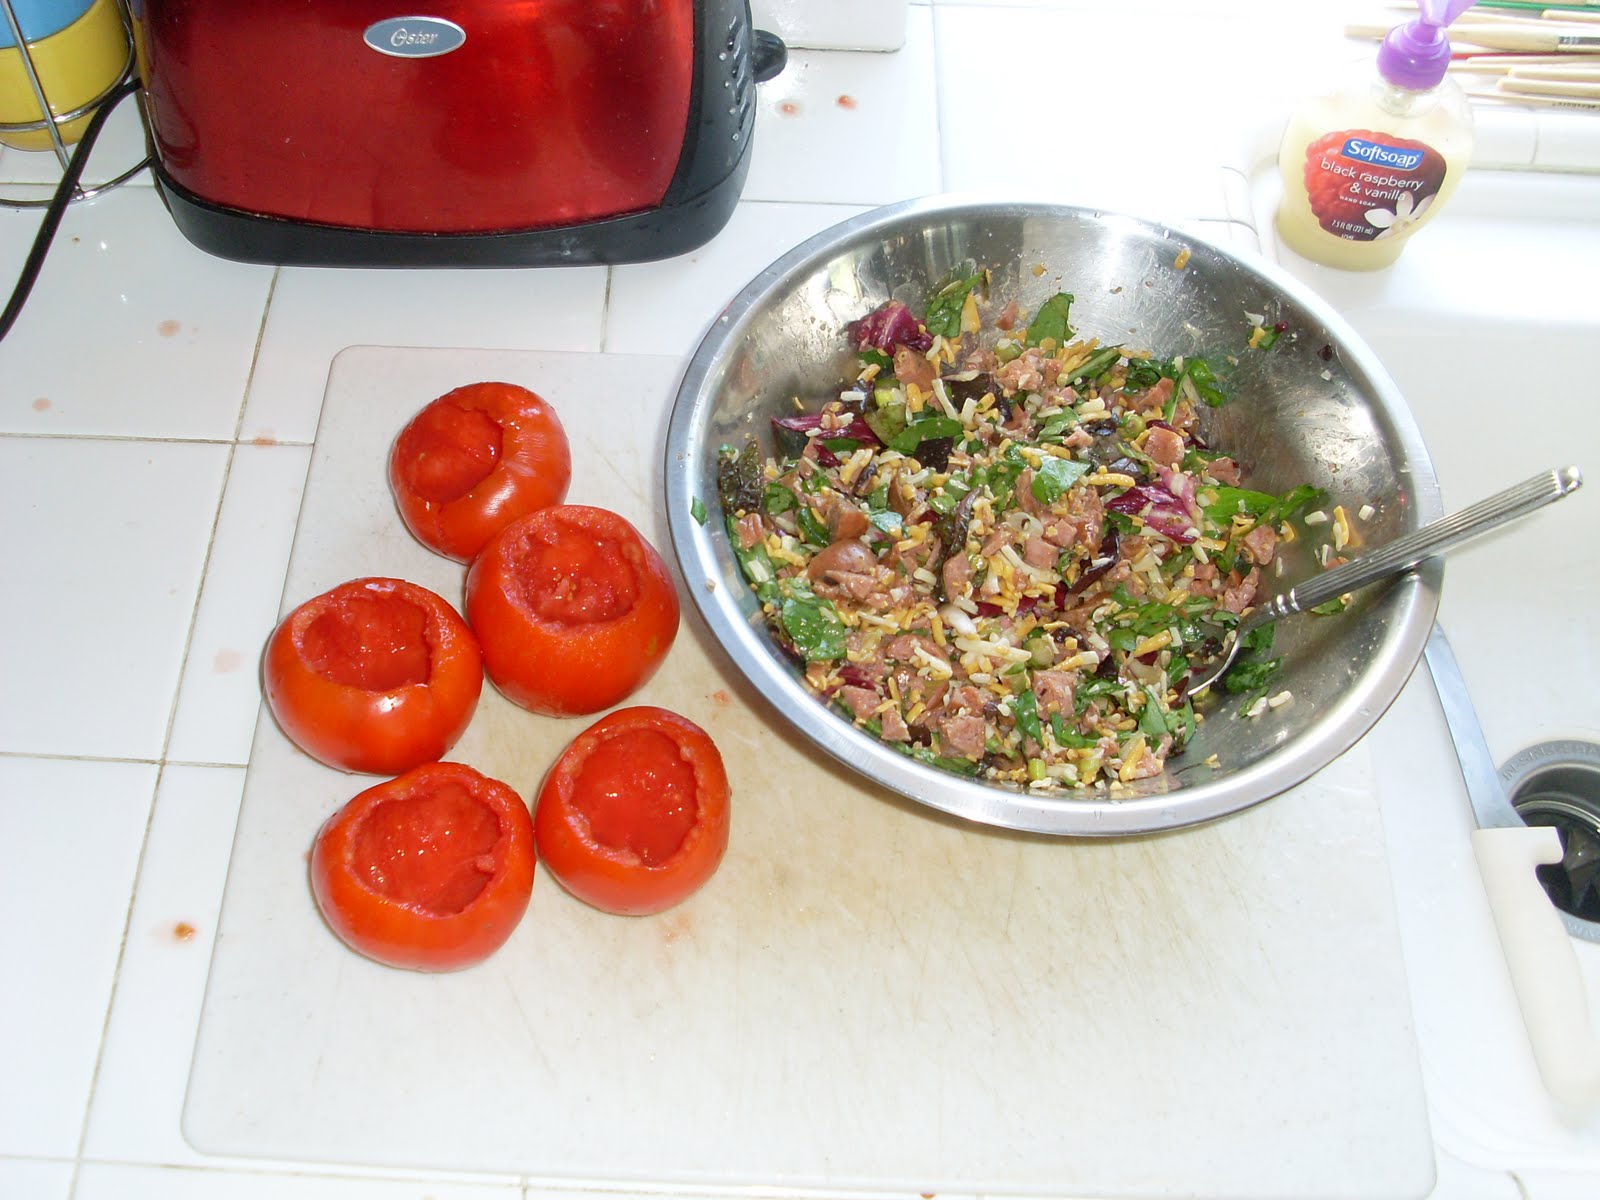
I cut the top off of the tomato and used a small spoon to get the guts out of the tomato. Be careful not to break the tomato skin. I picked out some pretty firm tomatoes to help make sure the skins didn't break during the coring process or during the cooking process.


I got as much of the guts out as possible without ruining the skin.


Some more creativity hit when I was looking to add some layers of flavor. I added 2 tablespoons of Rub Company Competition Style Rub, a few fresh squeezed lemons and a few tablespoons of blueberry balsamic vinegar. The sweet and sour will bring out the sweetness of the tomato.


I blended all the ingredients together and squeezed the lemons and added the balsamic vinegar. You could add some dry rub or some other spices / herbs that will accent the other ingredients in the stuffing.

Don't forget, this is a blank slate - pick out something that you like or whatever you have sitting in the fridge. Good hint is to make sure everything you use is already cooked - the tomato will not make it through a cook long enough to properly cook any meats.
As a final touch, I sprinkled on some bread crumbs. These crisp up for a nice top to the stuffed tomato. You can also sprinkle a little more cheese or some dry rub on top.


I cooked these at 225F on my Traeger Pellet Smoker. Another option is to cook these indirectly in a charcoal or gas grill. You could bake these in the oven if you don't have a smoker or grill. Make sure that you don't cook too hot and fast or the skin will burst. You want to cook these slow enough to get the stuffing heated up thoroughly without ruining the skin.


Since all the ingredients used do not need to be cooked to a certain temp, you only need to cook long enough to get the stuffing hot enough to make sure all the ingredients are appetizing and the flavors blend. You could cook until the internal temp gets to 160 but there are no rules as long as you use pre-cooked meats.


When the tomatoes are ready, use a good pair of tongs to move them off the grill or cooking surface. The skins are now soft enough to easily burst.


Here's the finished product with some Atomic Buffalo Turds and some zucchini planks sprinkled with The Rub Company Santa Maria seasoning. There's some pig candy thrown in for some extra credit.


Here's the meal plated up. Let's eat!

Wednesday, August 17, 2011

BBQ Beef Sandwich

BBQ Beef Sandwich!


This recipe uses 5 basic items in the recipe including the beef! I started with an easy to find piece of meat - Chuck Roast. It is an inexpensive piece of beef available in almost any grocery store around.


I got my piece of meat from a local rancher that focuses on grass fed, open range beef - MM Livestock. They also have a blog with lots of good ideas and information. If you don't live in Southern California, check out the web and see if you can find a beef rancher similar in your area! Not only does the beef have incredible flavor, the self sustaining theory of the rancher is refreshing in this rushed lifestyle most of us live.


Here's the 5 basic ingredients:
Beef Chuck Roast
Worcestershire Sauce
Simple Marvelous Sweet & Spicy Dry Rub
Apple Juice
BBQ Sauce

You can find Simply Marvelous on line here. Their dry rubs are amazing and can be used on almost anything. I suggest purchasing the 5 Pack Variety. You will not be let down!

If you don't have Simply Marvelous you can use your favorite dry rub. If the rub has a heavy or really spicy flavor, don't over do it, you want each layer of flavor to compliment, not overpower the other layers of flavor.

Rub the Worcestershire sauce liberally over the beef. You can't use too much! This will add a layer of flavor and allow the dry rub to stick to the meat. Let it soak in for 15 minutes or so and then apply the Simply Marvelous dry rub heavily over the meat. Let it rest for a 1/2 hour or so to allow the rub to melt into the meat.


While the meat is soaking in flavor, start your smoker. I smoked this chuck roast just like a brisket. Smoker was set at 225.


You could also use your oven or on the gas grill if you cook using the multi zone method. Turn the burner on the left side on it's lowest setting and place the meat on the far right side. Try and maintain the grate temp near the meat at 225F.

You can see that by the time the smoker was up to temp, the dry rub has completely melted into the surface of the meat.

Keeping with the brisket cooking method, I smoked the chuck roast until the internal temp reached 170F and then placed in a 1/2 pan with 1/4 cup of apple juice and then tightly covered in foil to continue cooking.

As soon as the internal temp hit 205F, I pulled the foil off and let it rest uncovered for 1/2 hour. This does two things - allows the bark or outside crust of the meat to harden up a bit to set the bark. It also stops the cooking process. If you wrap up a big piece of meat like this and rest it immediately, it can and usually will continue to cook and the internal temp will creep up 3 - 7 degrees. In some cases, this may be helpful. In this case it was not. The internal temp was already where I wanted it.

Now that the bark has firmed up, it's time to rest the meat. Wrap your meat in a few layers of heavy duty foil, then wrap in a towel and place in a clean dry cooler. Let the meat rest for at least 1 hour but no longer than 3 hours. You don't want the meat to cool down below 145F. Resting the meat allows the juices in the meat to redistribute throughout the meat ensuring tenderness and juiciness.

After you rest the meat, slice it in 1/4" - 1/2" thick slices and then cross cut the same thickness - kind of cubing up the meat.
After the meat is cubed up add to a pan and throw in your favorite sauce.
Mix up the sauce adding a little at a time. You don't want the flavor of the sauce to overpower the meat and dry rub - they should all add layers of flavor, complimenting each layer.
Throw that meat on a bun and eat!

Wednesday, July 27, 2011

Chili Cheese Dog Fatty

Chili Cheese Dog Fatty!

Why would anyone want to make such a monster? Because you can AND it was really incredible! Also - July is National Hot Dog Month - do you really need any more reasons?!?


You can add just about anything you want to a fatty or bacon explosion. The list of potential ingredients are limited only by your imagination. I had a hankerin' for a chili cheese dog but we were on our way to a friend's house and they wanted me to bring an appetizer. I don't think this is what they had in mind but it blew them away and there was none left.


The ingredient list is really basic:


  • Bacon - 2lbs of thick cut

  • Sausage - 5 links of Italian Hot but you could also use 2 lbs of Jimmy Dean Spicy in the chub pack.

  • Cheese - about 3 cups of shredded mild cheddar.

  • Hot Dogs - 5 all beef dogs

  • Chili - 1 can of no bean Hormel or similar chili

  • Dry Rub - I used Sweet Mesquite but you can use whatever you prefer to add some flavor

Course shred the cheese and chop the hot dogs into small pieces. I didn't want to over chop the hot dogs but they could have been chopped a bit smaller. Mix with the can of chili.

Spinkle a heavy layer of dry rub on the bacon weave. Empty the sausage casings and layer onto the bacon weave about a 1/4" thick.


Now the tricky part - how do you get all that stuffing into the middle of the fatty so it doesn't blow out. Simple - the Fatty Piston - make your own with these instructions.
Get all of your ingredients in your Fatty Piston and extrude the stuffing onto the fatty.


You can see from the pictures that a layer of Saran wrap was placed under the basket weave. This makes it SOOOO easy to roll up the Fatty. Simply lift up the Saran wrap and slowly roll the weave ensuring the stuffing stays inside. You can then use the Saran wrap and twist the ends to store the Fatty until ready for cooking. This will help keep the shape of the Fatty.


I smoked the fatty on my Traeger Smoker at 225 F until the internal temp was 165F. You could also bake the Fatty in the oven. Another option is to cook the Fatty on a gas grill as long as you cook on the indirect side - DO NOT cook bacon over an open flame and always be aware of the fat rendering out of the bacon and ensure you do not start a grease fire.

Slice the Fatty in 1/2" to 1" slices. Serve Hot! Good luck keeping the slices of incredible goodness around for long.

A serving suggestion is a few different types of mustards to dip in!


Good luck keeping this bad boy around for very long! I brought this as an appetizer but could also be served on a roll as a sandwich or a late night snack!